


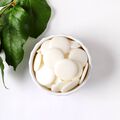
Dragon Fruit Bath Truffle Project
- Skill Level: Intermediate
- Time: 1 hour
- Yield: About 16 truffles
Project Description
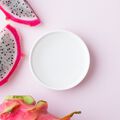
These bath truffles use Red Mica and poppy seeds to look like a dragon fruit. They're made with skin-loving cocoa butter, dragon fruit extract, and aloe butter. They're scented with Sweet Nectar and Hibiscus Fragrance Oil, which has notes of peach, pink hibiscus, sweet tea, and jasmine.
When added to the tub, the bath truffles fall to the bottom because the butters make them quite heavy. Slowly, they start to fizz and disperse the skin-loving ingredients. If you want to activate the bubbles, hold the bar directly under the faucet once the tub is almost full. Break up small pieces under the running water.
You can also place the bar into a fine mesh strainer and hold that under the faucet to help activate the bubbles. They're modest because of the butter, but still cover the surface of the tub.
Typical solid bubble bath recipes can take a week or more to harden because they have a high amount of glycerin. With this recipe, the bars harden in just a few hours because they're made with more butter.
While the bars are vibrant, we found the mica doesn't transfer on the tub. Polysorbate 80 prevents it from clumping up in the bath water.
Want more bath bomb supplies? Take a look at these DIY bath bomb kits.
You will need:
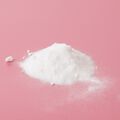
- 25 oz. Baking Soda (Sodium Bicarbonate)
- 7 oz. Citric Acid
- 4 oz. Cream of Tartar
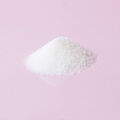
- 15 oz. SLSA
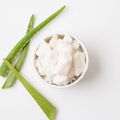
- 6 oz. Cocoa Butter
- 4 oz. Aloe Butter
- 2 oz. Dragon Fruit Extract
- 1 oz. Polysorbate 80
- 1 oz. Liquid Glycerin
- 0.8 oz. Sweet Nectar and Hibiscus Fragrance Oil
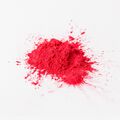
- 1/4 tsp. Red Mica
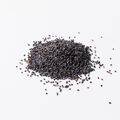
- 1 tsp. Poppy Seeds
Follow these steps:
1
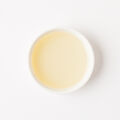
In a small heat-safe container, add 4 ounces of aloe butter and 6 ounces of cocoa butter. Melt in the microwave using 30-60 second bursts. Stir and set aside. Note: The cocoa butter takes a little while to melt. Be careful when removing it from the microwave, as it may be very hot.
2
Add 0.8 ounces of Sweet Nectar and Hibiscus Fragrance Oil, 2 ounces of dragon fruit extract, 1 ounce of glycerin, and 1 ounce of polysorbate 80. Stir and set aside.
3
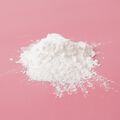
Place a fine mesh strainer over a large container. Add 25 ounces of baking soda, 7 ounces of citric acid, and 4 ounces of cream of tartar. Push the ingredients through the strainer to get rid of chunks. Use a whisk to mix.
4
Very carefully, add 15 ounces of SLSA to the large container and mix it in slowly. It can cause irritation if it becomes airborne - wear a mask if you like.
5
Add about ⅓ of the melted butter mixture. Use your hands to mix the liquid and powder ingredients. If you prefer, you can also use a stand or hand mixer for this step. Make sure to incorporate any powders that tend to hang out at the bottom of the bowl.
6
Continue adding the liquid ingredients to the dry and mixing until fully incorporated. The final texture will be very similar to cookie dough – soft, workable, and slightly sticky.
7
Split off 30 ounces of the mixture into a separate conainer. Add 1/4 teaspoon of Red Mica and use your hands or a stand mixer to mix until there are no streaks of color. To the remaining mixture, add 1 teaspoon of poppy seeds and mix to combine.
8
Lay down a sheet of parchment, wax, or freezer paper. Place all of the pink mixture onto the paper and form into a flat, rectanglular shape - don't worry about it being perfect. Place all of the white mixture into the center of the pink. Spread it out evenly. Note: We found a dough temperature of about 85-100° F is a great moldable texture. If yours is a lot cooler than that, place the container into the microwave for 10-20 seconds.
9
Carefully use the wax paper to roll the mixture into a long circle with the pink on the outside. Smooth and manipulate the log so it's even. Use a sharp knife to cut into slices.
10
Place the truffles down on wax paper. They start to cool after a few hours, but we recommend letting them sit for 3-4 days to fully harden. If you live in a very humid area, it may take longer. The truffles will always be a little bit delicate, even after they harden.
11
To use, fill the tub with hot water. Once it's about ¾ full, break up the truffle directly under the faucet to activate the bubbles. Enjoy!
Tutorial credits
Photographer: Amanda Kerzman
Dragon Fruit Bath Truffle Project
- Skill Level: Intermediate
- Time: 1 hour
- Yield: About 16 truffles
Project Description
These bath truffles use Red Mica and poppy seeds to look like a dragon fruit. They're made with skin-loving cocoa butter, dragon fruit extract, and aloe butter. They're scented with Sweet Nectar and Hibiscus Fragrance Oil, which has notes of peach, pink hibiscus, sweet tea, and jasmine.
When added to the tub, the bath truffles fall to the bottom because the butters make them quite heavy. Slowly, they start to fizz and disperse the skin-loving ingredients. If you want to activate the bubbles, hold the bar directly under the faucet once the tub is almost full. Break up small pieces under the running water.
You can also place the bar into a fine mesh strainer and hold that under the faucet to help activate the bubbles. They're modest because of the butter, but still cover the surface of the tub.
Typical solid bubble bath recipes can take a week or more to harden because they have a high amount of glycerin. With this recipe, the bars harden in just a few hours because they're made with more butter.
While the bars are vibrant, we found the mica doesn't transfer on the tub. Polysorbate 80 prevents it from clumping up in the bath water.
Want more bath bomb supplies? Take a look at these DIY bath bomb kits.
You will need:
- 25 oz. Baking Soda (Sodium Bicarbonate)
- 7 oz. Citric Acid
- 4 oz. Cream of Tartar
- 15 oz. SLSA
- 6 oz. Cocoa Butter
- 4 oz. Aloe Butter
- 2 oz. Dragon Fruit Extract
- 1 oz. Polysorbate 80
- 1 oz. Liquid Glycerin
- 0.8 oz. Sweet Nectar and Hibiscus Fragrance Oil
- 1/4 tsp. Red Mica
- 1 tsp. Poppy Seeds
Follow these steps:
1
In a small heat-safe container, add 4 ounces of aloe butter and 6 ounces of cocoa butter. Melt in the microwave using 30-60 second bursts. Stir and set aside. Note: The cocoa butter takes a little while to melt. Be careful when removing it from the microwave, as it may be very hot.
2
Add 0.8 ounces of Sweet Nectar and Hibiscus Fragrance Oil, 2 ounces of dragon fruit extract, 1 ounce of glycerin, and 1 ounce of polysorbate 80. Stir and set aside.
3
Place a fine mesh strainer over a large container. Add 25 ounces of baking soda, 7 ounces of citric acid, and 4 ounces of cream of tartar. Push the ingredients through the strainer to get rid of chunks. Use a whisk to mix.
4
Very carefully, add 15 ounces of SLSA to the large container and mix it in slowly. It can cause irritation if it becomes airborne - wear a mask if you like.
5
Add about ⅓ of the melted butter mixture. Use your hands to mix the liquid and powder ingredients. If you prefer, you can also use a stand or hand mixer for this step. Make sure to incorporate any powders that tend to hang out at the bottom of the bowl.
6
Continue adding the liquid ingredients to the dry and mixing until fully incorporated. The final texture will be very similar to cookie dough – soft, workable, and slightly sticky.
7
Split off 30 ounces of the mixture into a separate conainer. Add 1/4 teaspoon of Red Mica and use your hands or a stand mixer to mix until there are no streaks of color. To the remaining mixture, add 1 teaspoon of poppy seeds and mix to combine.
8
Lay down a sheet of parchment, wax, or freezer paper. Place all of the pink mixture onto the paper and form into a flat, rectanglular shape - don't worry about it being perfect. Place all of the white mixture into the center of the pink. Spread it out evenly. Note: We found a dough temperature of about 85-100° F is a great moldable texture. If yours is a lot cooler than that, place the container into the microwave for 10-20 seconds.
9
Carefully use the wax paper to roll the mixture into a long circle with the pink on the outside. Smooth and manipulate the log so it's even. Use a sharp knife to cut into slices.
10
Place the truffles down on wax paper. They start to cool after a few hours, but we recommend letting them sit for 3-4 days to fully harden. If you live in a very humid area, it may take longer. The truffles will always be a little bit delicate, even after they harden.
11
To use, fill the tub with hot water. Once it's about ¾ full, break up the truffle directly under the faucet to activate the bubbles. Enjoy!
Tutorial credits
Photographer: Amanda Kerzman