
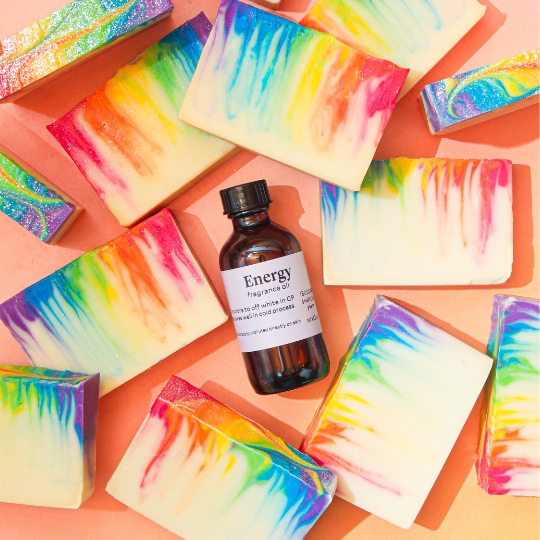

Rainbow Splash Soap Project
This colorful soap project was created in collaboration with Nathan from Clover Soapworks. It features a Splash Swirl design, which is achieved using the Hanger Swirl Tool. Our best-selling Energy Fragrance Oil adds a bright, fruity scent to this project.
This is an advanced soap project. It requires a good understanding of trace, because you need plenty of time to pour all the colors into the mold and swirl. To help, we recommend adding the dispersed colorants into each container before emulsifying the soap. Adding the fragrance to each individual container right before pouring also helps keep the soap fluid longer.
If the soap starts to thicken as you pour, don't panic. Keep whisks nearby to stir each container throughout the pouring process. This helps keep the soap fluid, pourable, and able to be swirled with the Hanger Tool. We recommend promoting gel phase by covering the mold and placing it on a heating pad for 1-2 hours.
What You Need:
.jpg?sw=400&sh=400&sm=fit)


Instructions

Ingredient amounts:
- 33 oz. Swirl Quick Mix
- 4.4 oz. Sodium Hydroxide Lye
- 9.8 oz. Distilled Water
- 2 tsp. Sodium Lactate (optional)
- 1.75 oz. Energy Fragrance Oil
- 1/2 teaspoon Red Mica
- 1/2 teaspoon Sunset Orange Mica
- 1/2 teaspoon Yellow Mica
- 1/2 teaspoon Kermit Green Mica
- 1/2 teaspoon Caribbean Blue Mica
- 1/2 teaspoon Queen's Purple Mica
COLORANT PREP: In six separate containers (paper cups work great) and disperse 1/2 teaspoon of each mica (except Lilac UltraSparkle Mica) into 1 teaspoon of lightweight liquid oil. Use a mini mixer to get rid of any clumps.
SAFETY FIRST: Suit up for safe handling practices. That means goggles, gloves, and long sleeves. Make sure kids, pets, other distractions, and tripping hazards are out of the house or don’t have access to your space. Always make soap in a well-ventilated area.
Follow these steps:
1
Slowly and carefully add 4.4 oz of lye to 9.8 ounces of water and gently stir until the lye has fully dissolved and the liquid is clear. Set aside to cool. Add 2 teaspoons of sodium lactate and stir throughly.
2
Fully melt the entire bag of Swirl Recipe Quick Mix in the microwave using 30-60 second bursts until the oils in the bag is clear. Pour into a heat-safe container and let cool. Once the lye water and oils have cooled to about 110° F or below (and are ideally within 10 degrees of each other), add the lye water to the oils and whisk together to combine. Use the stick blender to pulse into the soap has reached a thin trace.
3
Pour your uncolored, unscented soap batter into each of the six containers. Each container should have around 1.5 ounces of soap. Don’t mix until right before you’re about to pour. Set aside your six containers.
4
Add all 1.75 oz of fragrance oil to your uncolored soap, whisking thoroughly. Pour all of your uncolored batter into the mold.
5
Use a mini mixer to mix in your mica dilutions with the uncolored batter. Then, once your uncolored batter has thickened enough to support more soap on top, gently pour each soap color in long, skinny, vertical lines. If you're using paper cups, we recommend pinching the cup for a more narrow, controlled pour. The order of the lines should be: Red, Orange, Yellow, Green, Blue, Purple.
6
Once you have all six lines poured, take your hanger tool and slowly push each line of color up and down. Do this up-and-down motion at least five times for each line of color. Pushing straight up and down is what gives us those wispy vertical lines of color. Be sure to move only your hanger tool up and down and not side to side, otherwise your colors will mix together and become muddy.
7
Once you have gone over each color several times, take a chopstick or wood dowel and do a linear swirl across the top of your soap. If you prefer, you can also texturize with the back of a spoon, or leave the top as is.
8
Spritz the top of your soap with isoproypl alcohol to prevent soda ash. Optionally, you can sprinkle a light dusting of Lilac UltraSparkle Mica on top.
9
Cover the mold and place on a heating pad for 1-2 hours to promote gel phase. Gel phase helps the colors pop and it helps the loaf release from the mold faster and more easily.
10
Spritz the top of the soap with 99% isopropyl alcohol to prevent soda ash. Cover the mold and place on a heating pad for 1-2 hours to promote gel phase. Gel phase helps the colors pop and it helps the bars release from the dividers faster and more easily. Allow the soap to cure for 4-6 weeks, and enjoy!
Tutorial credits
Photographer: Hannah Wong
Rainbow Splash Soap Project
- LEVEL Advanced
- TIME 1 hour
- YIELD About 3 pounds of soap
Project Description
This is an advanced soap project. It requires a good understanding of trace, because you need plenty of time to pour all the colors into the mold and swirl. To help, we recommend adding the dispersed colorants into each container before emulsifying the soap. Adding the fragrance to each individual container right before pouring also helps keep the soap fluid longer.
If the soap starts to thicken as you pour, don't panic. Keep whisks nearby to stir each container throughout the pouring process. This helps keep the soap fluid, pourable, and able to be swirled with the Hanger Tool. We recommend promoting gel phase by covering the mold and placing it on a heating pad for 1-2 hours.
Ingredient amounts:
- 33 oz. Swirl Quick Mix
- 4.4 oz. Sodium Hydroxide Lye
- 9.8 oz. Distilled Water
- 2 tsp. Sodium Lactate (optional)
- 1.75 oz. Energy Fragrance Oil
- 1/2 teaspoon Red Mica
- 1/2 teaspoon Sunset Orange Mica
- 1/2 teaspoon Yellow Mica
- 1/2 teaspoon Kermit Green Mica
- 1/2 teaspoon Caribbean Blue Mica
- 1/2 teaspoon Queen's Purple Mica
COLORANT PREP: In six separate containers (paper cups work great) and disperse 1/2 teaspoon of each mica (except Lilac UltraSparkle Mica) into 1 teaspoon of lightweight liquid oil. Use a mini mixer to get rid of any clumps.
SAFETY FIRST: Suit up for safe handling practices. That means goggles, gloves, and long sleeves. Make sure kids, pets, other distractions, and tripping hazards are out of the house or don’t have access to your space. Always make soap in a well-ventilated area.
Follow these steps:
1
Slowly and carefully add 4.4 oz of lye to 9.8 ounces of water and gently stir until the lye has fully dissolved and the liquid is clear. Set aside to cool. Add 2 teaspoons of sodium lactate and stir throughly.
2
Fully melt the entire bag of Swirl Recipe Quick Mix in the microwave using 30-60 second bursts until the oils in the bag is clear. Pour into a heat-safe container and let cool. Once the lye water and oils have cooled to about 110° F or below (and are ideally within 10 degrees of each other), add the lye water to the oils and whisk together to combine. Use the stick blender to pulse into the soap has reached a thin trace.
3
Pour your uncolored, unscented soap batter into each of the six containers. Each container should have around 1.5 ounces of soap. Don’t mix until right before you’re about to pour. Set aside your six containers.
4
Add all 1.75 oz of fragrance oil to your uncolored soap, whisking thoroughly. Pour all of your uncolored batter into the mold.
5
Use a mini mixer to mix in your mica dilutions with the uncolored batter. Then, once your uncolored batter has thickened enough to support more soap on top, gently pour each soap color in long, skinny, vertical lines. If you're using paper cups, we recommend pinching the cup for a more narrow, controlled pour. The order of the lines should be: Red, Orange, Yellow, Green, Blue, Purple.
6
Once you have all six lines poured, take your hanger tool and slowly push each line of color up and down. Do this up-and-down motion at least five times for each line of color. Pushing straight up and down is what gives us those wispy vertical lines of color. Be sure to move only your hanger tool up and down and not side to side, otherwise your colors will mix together and become muddy.
7
Once you have gone over each color several times, take a chopstick or wood dowel and do a linear swirl across the top of your soap. If you prefer, you can also texturize with the back of a spoon, or leave the top as is.
8
Spritz the top of your soap with isoproypl alcohol to prevent soda ash. Optionally, you can sprinkle a light dusting of Lilac UltraSparkle Mica on top.
9
Cover the mold and place on a heating pad for 1-2 hours to promote gel phase. Gel phase helps the colors pop and it helps the loaf release from the mold faster and more easily.
10
Spritz the top of the soap with 99% isopropyl alcohol to prevent soda ash. Cover the mold and place on a heating pad for 1-2 hours to promote gel phase. Gel phase helps the colors pop and it helps the bars release from the dividers faster and more easily. Allow the soap to cure for 4-6 weeks, and enjoy!
Tutorial credits
Photographer: Hannah Wong