


Ombre Heart Soap Project
- Skill Level: Beginner
- Time: 1 hour
- Yield: 6 bars of soap
Project Description
They are created by layering three shades of soap in the 6 Cavity Heart Silicone Mold. A combination of Queen's Purple Color Block and Lavender Color Blocks gave us striking contrast, but feel free to swap for whatever colors you prefer.
The key to layering melt and pour soap is patience, temperature, and 99% isopropyl alcohol. Before pouring a layer, ensure layer below has cooled and hardened enough to support the second layer. Also, make sure the soap is no hotter than about 130 degrees F, or it can melt the layer below.
You will need:
- 6 Cavity Silicone Heart Mold
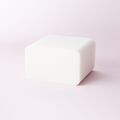
- 16 oz. White Melt and Pour Soap
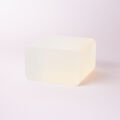
- 8 oz. Clear Melt and Pour Soap
- 0.6 oz. Camellia Sugar Fragrance Oil
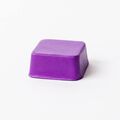
- Queen's Purple Color Block
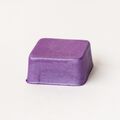
- Lavender Color Block
- 99% Isopropyl Alcohol
Follow these steps:
1
Chop 16 ounces of White Melt and Pour Soap Base into small uniform cubes. Chop 8 ounces of Clear Melt and Pour Soap Base into small uniform cubes. Split the cubes into three containers - two containers with 8 ounces of White Melt and Pour, and one container with 8 ounces of Clear Melt and Pour.
2
Melt all three containers of soap in the microwave using 30-60 second bursts. Once melted, add 0.2 ounces of Camellia Sugar Fragrance Oil to each container and stir in thoroughly.
3
To the container of clear soap, add a generous hunk of Queen's Purple Color Block. Stir to help the Color Block melt. Add more until you have a deep purple color. Pour the soap into each cavity of the mold, about 1/3 of the way full. Spritz with 99% isopropyl alcohol to help get rid of bubbles. Allow to cool and harden - while it cools, proceed to step 4.
4
To one container of melted white soap, add a chunk of Lavender Color Block and stir. Add more if necessary, until you have a light yet saturated purple color. Allow the container of soap to cool to about 130 degrees F.
5
Check the purple soap in the mold. It needs to be firm enough to support the layer of light purple soap. When the dark purple layer layer is ready, and the light purple soap is about 125-130° F, spritz the bottom layer of soap with isopropyl alcohol and pour light purple soap into each mold cavity evenly. Spritz with alcohol to help get rid of bubbles.
6
To the last container of soap, add a small amount of Lavender Color Block until you have a very light purple. You may need to gently reheat the soap to help the Color Block Melt - do so using short 15 second bursts.
7
Once the purple soap in the mold is firm enough to support the next layer and the melted soap is below 130 degrees F, spritz the soap in the mold with 99% isopropyl alcohol and pour the soap into each cavity. Spritz again with 99% isopropyl alcohol to get rid of bubbles.
8
Allow the soap to fully cool and harden for about 2-3 hours, up to overnight. Release the soap from the mold. Wrap the bars in plastic wrap to help prevent glycerin dew. The soap is ready to use right away - enjoy!
Tutorial credits
Photographer: Hannah Wong
Ombre Heart Soap Project
- Skill Level: Beginner
- Time: 1 hour
- Yield: 6 bars of soap
Project Description
They are created by layering three shades of soap in the 6 Cavity Heart Silicone Mold. A combination of Queen's Purple Color Block and Lavender Color Blocks gave us striking contrast, but feel free to swap for whatever colors you prefer.
The key to layering melt and pour soap is patience, temperature, and 99% isopropyl alcohol. Before pouring a layer, ensure layer below has cooled and hardened enough to support the second layer. Also, make sure the soap is no hotter than about 130 degrees F, or it can melt the layer below.
You will need:
- 6 Cavity Silicone Heart Mold
- 16 oz. White Melt and Pour Soap
- 8 oz. Clear Melt and Pour Soap
- 0.6 oz. Camellia Sugar Fragrance Oil
- Queen's Purple Color Block
- Lavender Color Block
- 99% Isopropyl Alcohol
Follow these steps:
1
Chop 16 ounces of White Melt and Pour Soap Base into small uniform cubes. Chop 8 ounces of Clear Melt and Pour Soap Base into small uniform cubes. Split the cubes into three containers - two containers with 8 ounces of White Melt and Pour, and one container with 8 ounces of Clear Melt and Pour.
2
Melt all three containers of soap in the microwave using 30-60 second bursts. Once melted, add 0.2 ounces of Camellia Sugar Fragrance Oil to each container and stir in thoroughly.
3
To the container of clear soap, add a generous hunk of Queen's Purple Color Block. Stir to help the Color Block melt. Add more until you have a deep purple color. Pour the soap into each cavity of the mold, about 1/3 of the way full. Spritz with 99% isopropyl alcohol to help get rid of bubbles. Allow to cool and harden - while it cools, proceed to step 4.
4
To one container of melted white soap, add a chunk of Lavender Color Block and stir. Add more if necessary, until you have a light yet saturated purple color. Allow the container of soap to cool to about 130 degrees F.
5
Check the purple soap in the mold. It needs to be firm enough to support the layer of light purple soap. When the dark purple layer layer is ready, and the light purple soap is about 125-130° F, spritz the bottom layer of soap with isopropyl alcohol and pour light purple soap into each mold cavity evenly. Spritz with alcohol to help get rid of bubbles.
6
To the last container of soap, add a small amount of Lavender Color Block until you have a very light purple. You may need to gently reheat the soap to help the Color Block Melt - do so using short 15 second bursts.
7
Once the purple soap in the mold is firm enough to support the next layer and the melted soap is below 130 degrees F, spritz the soap in the mold with 99% isopropyl alcohol and pour the soap into each cavity. Spritz again with 99% isopropyl alcohol to get rid of bubbles.
8
Allow the soap to fully cool and harden for about 2-3 hours, up to overnight. Release the soap from the mold. Wrap the bars in plastic wrap to help prevent glycerin dew. The soap is ready to use right away - enjoy!
Tutorial credits
Photographer: Hannah Wong