


Sensuous Sandalwood Candle Project
- Skill Level:
- Time: 1 hour
- Yield: 4 candles
Project Description
To create a monochromatic look, the Coconut Soy Wax is dyed to match the Terracotta Two-Tone Ceramic using wax dye flakes. They're easy to use - simply add small pieces of the dye flakes to melted wax and stir. Learn more about coloring candle wax.
The exact amount of each color needed to create the right hue is an art rather than a science. We recommend placing drops of your melted wax onto a piece of wax paper or nonporous surface to test the color and adjust accordingly.
You will need:
- Four Terracotta Two-Tone Ceramic Containers
- 40 oz. Coconut Soy Wax Blend
- 3.2 oz. Sensuous Sandalwood Fragrance OIl
- Strawberry Red Wax Dye Flakes
- Melon Orange Wax Dye Flakes
- Charcoal Black Wax Dye Flakes
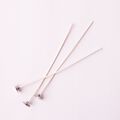
- 4 HTP 1212 Wicks
- 4 Wick Stickers
Follow these steps:
1
Place a half-filled pot of water on the stove, bring it to a low simmer, and nest a pouring pitcher or other heat-safe container inside. Add 40 ounces of Coconut Soy Wax and let it melt. Weigh out 3.2 ounces of Sensuous Sandalwood Fragrance Oil into a glass container, set aside.
2
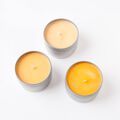
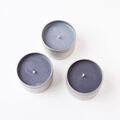
Once the wax reaches 185° F, it's time to add color. Lay out a piece of parchment or wax paper (or other nonporous surface you're not worried about damaging) to drop wax onto to test the shade. Begin by adding small pieces of the Strawberry Red Wax Dye Flakes until you have a soft red/pink color. Continue adding small pieces of the Melon Orange to create a warmer tone, along with very small pieces of the Charcoal Black Wax Dye Flakes to tone down the saturation. Once you're happy with the color, remove it from the heat and slowly stir in the fragrance for 1-2 minutes to fully incorporate. Set aside to cool.
3
Place wick stickers on the ends of the HTP 1212 wicks and adhere firmly to the center bottom of the 4 jars.
4
Once the wax is at about 135° F, pour it slowly into the prepped jars. Secure the wicks with a clothespin (or other tool).
5
Wait 12-24 hours to allow the candles to fully cool. Trim the wick to 1/4" above the wax. Allow the candles to cure for 3-5 days so the fragrance completely bonds with the wax. Burn your candle until it reaches a full melt pool for best results.
Tutorial credits
Photographer: Amanda Kerzman
Sensuous Sandalwood Candle Project
- Skill Level:
- Time: 1 hour
- Yield: 4 candles
Project Description
To create a monochromatic look, the Coconut Soy Wax is dyed to match the Terracotta Two-Tone Ceramic using wax dye flakes. They're easy to use - simply add small pieces of the dye flakes to melted wax and stir. Learn more about coloring candle wax.
The exact amount of each color needed to create the right hue is an art rather than a science. We recommend placing drops of your melted wax onto a piece of wax paper or nonporous surface to test the color and adjust accordingly.
You will need:
- Four Terracotta Two-Tone Ceramic Containers
- 40 oz. Coconut Soy Wax Blend
- 3.2 oz. Sensuous Sandalwood Fragrance OIl
- Strawberry Red Wax Dye Flakes
- Melon Orange Wax Dye Flakes
- Charcoal Black Wax Dye Flakes
- 4 HTP 1212 Wicks
- 4 Wick Stickers
Follow these steps:
1
Place a half-filled pot of water on the stove, bring it to a low simmer, and nest a pouring pitcher or other heat-safe container inside. Add 40 ounces of Coconut Soy Wax and let it melt. Weigh out 3.2 ounces of Sensuous Sandalwood Fragrance Oil into a glass container, set aside.
2
Once the wax reaches 185° F, it's time to add color. Lay out a piece of parchment or wax paper (or other nonporous surface you're not worried about damaging) to drop wax onto to test the shade. Begin by adding small pieces of the Strawberry Red Wax Dye Flakes until you have a soft red/pink color. Continue adding small pieces of the Melon Orange to create a warmer tone, along with very small pieces of the Charcoal Black Wax Dye Flakes to tone down the saturation. Once you're happy with the color, remove it from the heat and slowly stir in the fragrance for 1-2 minutes to fully incorporate. Set aside to cool.
3
Place wick stickers on the ends of the HTP 1212 wicks and adhere firmly to the center bottom of the 4 jars.
4
Once the wax is at about 135° F, pour it slowly into the prepped jars. Secure the wicks with a clothespin (or other tool).
5
Wait 12-24 hours to allow the candles to fully cool. Trim the wick to 1/4" above the wax. Allow the candles to cure for 3-5 days so the fragrance completely bonds with the wax. Burn your candle until it reaches a full melt pool for best results.
Tutorial credits
Photographer: Amanda Kerzman